
Walkthrough notes
The key to help with this game, is not a straight-forward go here, go there, like with Hidden Object-games or Adventure-games. Instead, I'll give you some helpful strategy basics, the pros and cons of of your plants, a strategy against the different zombies, and tips on the extra puzzles and mini-games.
The times in this walkthrough are given in patches, which stand for the amount of patches an average zombie walks; this comes down to about 5 seconds per patch.
Besides Gamezebo wisdom, at the end of the walkthrough, you will find tips and tricks from the Tree of Wisdom.
Easter Eggs – funny extras
Type in the following codes during gameplay to activate them. Type them in again, to de-activate them. For some of the Easter eggs, your tree of wisdom needs to be a certain height, but often (not always, sorry if you are unlucky), you will be able to turn the Easter eggs on at any point.
From the go, you will want to start planting as many Sunflowers (or Sun-shrooms at night) as you can. In general, your aim should be to plant around 10 to 12 sunflowers total.
Situation: A zombie approaches, and I must choose to plant an attack plant, or another sunflower.
Your choice depends on how far away the zombie is, and your current amount of suns. The image below shows you an example.
 In the pool-level, you will be rewarded with a Twin Sunflower, which will produce two suns at once.
Do not plant this untill you have planted all the sunflowers you are going to, since the extra costs can be better used.
While you can use sunflowers at night, their extra costs don't weigh up to the initial extra sun production, so it's best to use just sunflowers during the day, and just sun-shrooms during the night.
Basic strategy – deciding upon your arsenal
At the start of each new level, you can choose which plants you want to choose.
On the right side of the screen, you will see which zombies you will encounter in this level.
You start with 5 plant-slots, but as your adventure progresses, Crazy Dave will offer you extra slots.
You will want to get up to 8 slots as soon as possible, but the 9th can waith (also because it's just very expensive). If you're running short on money for the 8th slot, you likely will, you can try and play mini-games to gather some extra money.
When deciding your arsenal, you first need to select the basics. You need a sun-producing plant, a cheap attack plant (you need them for the start of the level), and I would advice to choose at least one life-saver, such as a Cherry Bomb or Jalapeno, that can provide a last defense.
If you are going to get a Digger zombie, don't forget to get a split pea or a magnet, while the Balloon zombie will require either a Cactus or a Blover. The rest of the slots, you can fill with your favourite plants, depending if you like to play it agressive or defensive. Personally, I like combining peashooters with torchwood, but each player may have their own preference.
Basic strategy – timing your gardening
It may come as a shock, but zombies do not play nice. When you think you're almost save, and have a decent defense on 3 of your 5 lanes, suddenly two zombies appear on the other two. How are you going to stop them both!?
Timing is essential in this game. The above situation might make you feel helpless, but if one zombie is much slower then the other, that gives you the chance to tackle them both. That's why I've made a little chart below, with the average time (in distance covered by a zombie) it takes the most common plants to kill a normal zombie, and how long it takes to kill a Conehead zombie.
Plant
Time to kill a normal zombie
Time to kill a conehead zombie
Peashooter 2.5 patches
6 patches
Snow Pea
1.5 patches
3.5 patches
Repeater 1.25 patches
3 patches
Threepeater 2 patches
4 patches
Spikeweed 2 patches 4 patches
Cactus
2 patches
4 patches
Split Pea
2. 5 patches forward
6 patches
1.25 patches backward
3 patches backward
Cabbage-pult 2 patches
3.5 patches
Melon-pult
1.5 patches
3.5 patche
The Kernel-pult randomly fires either kernels, which take out a normal zombie in 5 patches (12 for coneheads), or butter, which will immobilize the zombie and takes out a normal zombie in 3 hits (7 hits for a conehead).
The Sunflower and Sun-shroom produce their first sun in 7 seconds (1.5 patch), but then take 20 seconds (4 patches) for every next sun. Recharging takes 25 seconds (5 patches).
Plant strategies
The game has a very nifty Suburban Almanac, which can be found in the main menu, that shows you a description of all the plants you have unlocked. In this section, I will give some additional hints on how to maximize the use of some of the plants.
The game has a very nifty Suburban Almanac, which can be found in the main menu, that shows you a description of all the zombies you have encountered. In this section, I will give some additional hints on how to best take on some of those thougher zombies.
After beating level 5-4, you will unlock the Zen Garden. Besides being Zen, and making you happy (you don't have to be a hippy to be made happy be flowers), tending to the flowers in the garden will also earn you money. While the initial price of $3.000 per flower that Crazy Dave charges might seem steep, you will earn it back by the coins they give you over time, and when fully grown, you can sell them back for $3.000. You will know a plant is fully grown when there are sparkles surrounding it.
Besides buying Marigolds at Crazy Dave, you will also randomly receive plants for your Zen Garden while playing the game, but after having beaten adventure mode at least once. These plants are usually worth quite a bit more.
In time, you will also receive mushrooms and aquatic plants for your Zen Garden. You will need to buy their own environments to be able to grow them. Use the gardening glove to move them.
Lastly, you can buy the Tree of Wisdom environment, where you will find a sprout of the Tree of Wisdom. The more you feed him, the more tips and tricks he will give you. However, you can also simply check the end of this walkthrough.
Mini-games
ZomBotany – the tables are turned, as the zombies' heads will now be peashooters, and shoot back! Even if you've never used wall-nuts or tall-nuts before, you might want to give them a try now.
Wall-nut bowling – roll wall-nuts from behind the line to take out the zombies. The key here is to make combo's, whether it is by rolling an explosive wall-nut in the middle of three groups, taking out one group on each line, or by bouncing them off zombies.
Slot-machine – very random, and thus possibly very dangerous. Set up a lawn defense with whatever the slot machine offers you.
It's raining seeds – like the slot machine, a pretty random game where you need to put up a lawn defense with whatever comes raining down. It's on the fog-level though, so be extra careful, and be prepaired for anything.
Seeing stars – while defending your lawn, place star fruits on the marked places. I found the best way, next to planting lots of sunflowers, is to start with a star fruit in the middle, and placing a tall-nut in the space behind one of the directions you shoot in. That way, you still them right where you can reach them. Also take some cherry bombs if they're getting too close. Expand your star fruit collection from the middle.
Zombiquarium – feed the snorkeling zombies in the aquarium to get more suns, which you can use to get new zombies. Eventually you will want to collect a 1.000 suns to finish the level. Don't feed the zombies too fast, or it will just be a brain (and 5 suns) wasted, but when they turn green, watch out as they're about to, ehm... undie. How many zombies you take total depends on your patience, and skills to keep clicking.
Beghouled Twist – a twist of Bejeweled Twist, your goal is to twist the plants to make 75 match 3's, while defending your yard. A good twist will earn you sons, which you can use to upgrade your plants.
Big Trouble Little Zombies – another mini-game where you are randomly given plants, now via a conveyor belt. The zombies are little, but still cause big trouble. You will only receive peashooters, cherry bombs, lily pads and wall-nuts. Try and get a peashooter on every row as soon as possible, and use cherry bombs to take out zombies in groups.
Portal Combat – it seems to start out easy, with both zombies and your bullets going through a portal one way, and out the twin portal. The tricky thing is that the protals will change positions, so setting up a strategy is difficult. Try and put a repeater with a torchwood on the first 2 places of each lane, since those are least likely to be portaled.
Column Like You See 'Em – in this level, you will be on top of the roof, and every item you place from the conveyor belt is placed in all pots on the row you select. The best strategie is to have a tall-nut in the very front, with magnet-shrooms just behind that, and pults at the very back. Remember that peashooters can't shoot over the bending of the roof. When your tall-nuts are defeated, use a jalapeno and hope for another line of nuts.
Bobsled Bonanza – in Bobsled Bonanza, you will only face Zomboni's and Bob Sled Team Zombies, so your choice of plants should be peashooters (single and repeaters) combined with the torchwoods, jalapeno's to melt the ice, and then spikeweed to pop Zomboni's tires. The imitator is very usefull for using extra sunflowers or jalapeno's.
Zombie Nimble Zombie Quick – it is very easy to get confused on this level, where all the zombies go twice as fast. Don't worry though, since so are your plants. And since there are mostly weak zombies, it all comes down to fast decission making.
Whack a Zombie – wack-a-mole with zombies, only now they're moving towards the house! Make good use of the extra items you have, and train your fast reflexes.
The Last Stand – you start with $5.000 and need to set up your plants to survive 5 rounds of zombies, with $250 to refill between rounds.
Below you find my winning strategy (encircled in red are added or updated items):

Starting set-up for the first flag

Set-up for the second flag

Set-up for the third flag
For the fourth and the fifth flag, I simply repaired my army of plants.
ZoBotany 2 – a harder version of ZomBotany
Walnut Bowling 2 – a harder version of Walnut Bowling
Pogo Party – a combination of squash, pults and magnet-shrooms are your best friends on this pogo party.
Dr. Zomboss' Revenge – as the title implies, you fight against Dr. Zomboss again, but this time, he'll be even harder. Good luck!
Puzzles – Vasebreaker
The vasebreaker puzzles will have you break a lawn full of vases, randomly containing either plants or zombies. Since it is quite random what comes out, and the plants disappear if you don't plant them fast enough, it's hard to really set up a good strategy. There are some things that are helpful to keep in mind:
Puzzles – I, Zombie

Survival
In survival mode, your goal is to survive 5 flags of attacks, in several locations. After each flag, your garden and sunscore is kept, but you will be allowed to fill your slots again, possibly with new plants. Use this to your advantage, by building basics of your set-up in the earlier and easier attacks, to be able to go all-out in the last stand.
Tree of Wisdom's Tips and Tricks
Read more
The key to help with this game, is not a straight-forward go here, go there, like with Hidden Object-games or Adventure-games. Instead, I'll give you some helpful strategy basics, the pros and cons of of your plants, a strategy against the different zombies, and tips on the extra puzzles and mini-games.
The times in this walkthrough are given in patches, which stand for the amount of patches an average zombie walks; this comes down to about 5 seconds per patch.
Besides Gamezebo wisdom, at the end of the walkthrough, you will find tips and tricks from the Tree of Wisdom.
Easter Eggs – funny extras
Type in the following codes during gameplay to activate them. Type them in again, to de-activate them. For some of the Easter eggs, your tree of wisdom needs to be a certain height, but often (not always, sorry if you are unlucky), you will be able to turn the Easter eggs on at any point.
- ”future” - the zombies wear retro sunglasses
- ”mustache” - the zombies get a mustache
- ”trickedout” - a visual upgrade of the lawnmowers
- "sukhbir" - toggles the zombie's call for brains sound
- ”pinata” - a shower of candy when a zombie dies (tree of wisdom at 500 feet)
- ”daisies” - flowers sprout from fallen zombies (tree of wisdom at 100 feet)
- "dance" - makes the zombies dance (tree of wisdom at 1,000 feet)
From the go, you will want to start planting as many Sunflowers (or Sun-shrooms at night) as you can. In general, your aim should be to plant around 10 to 12 sunflowers total.
Situation: A zombie approaches, and I must choose to plant an attack plant, or another sunflower.
Your choice depends on how far away the zombie is, and your current amount of suns. The image below shows you an example.
In the pool-level, you will be rewarded with a Twin Sunflower, which will produce two suns at once.Do not plant this untill you have planted all the sunflowers you are going to, since the extra costs can be better used.
While you can use sunflowers at night, their extra costs don't weigh up to the initial extra sun production, so it's best to use just sunflowers during the day, and just sun-shrooms during the night.
Basic strategy – deciding upon your arsenal
At the start of each new level, you can choose which plants you want to choose.
On the right side of the screen, you will see which zombies you will encounter in this level.
You start with 5 plant-slots, but as your adventure progresses, Crazy Dave will offer you extra slots.
You will want to get up to 8 slots as soon as possible, but the 9th can waith (also because it's just very expensive). If you're running short on money for the 8th slot, you likely will, you can try and play mini-games to gather some extra money.
When deciding your arsenal, you first need to select the basics. You need a sun-producing plant, a cheap attack plant (you need them for the start of the level), and I would advice to choose at least one life-saver, such as a Cherry Bomb or Jalapeno, that can provide a last defense.
If you are going to get a Digger zombie, don't forget to get a split pea or a magnet, while the Balloon zombie will require either a Cactus or a Blover. The rest of the slots, you can fill with your favourite plants, depending if you like to play it agressive or defensive. Personally, I like combining peashooters with torchwood, but each player may have their own preference.
Basic strategy – timing your gardening
It may come as a shock, but zombies do not play nice. When you think you're almost save, and have a decent defense on 3 of your 5 lanes, suddenly two zombies appear on the other two. How are you going to stop them both!?
Timing is essential in this game. The above situation might make you feel helpless, but if one zombie is much slower then the other, that gives you the chance to tackle them both. That's why I've made a little chart below, with the average time (in distance covered by a zombie) it takes the most common plants to kill a normal zombie, and how long it takes to kill a Conehead zombie.
Plant
Time to kill a normal zombie
Time to kill a conehead zombie
Peashooter 2.5 patches
6 patches
Snow Pea
1.5 patches
3.5 patches
Repeater 1.25 patches
3 patches
Threepeater 2 patches
4 patches
Spikeweed 2 patches 4 patches
Cactus
2 patches
4 patches
Split Pea
2. 5 patches forward
6 patches
1.25 patches backward
3 patches backward
Cabbage-pult 2 patches
3.5 patches
Melon-pult
1.5 patches
3.5 patche
- Shooting a pea through Torchwood will kill zombies twice as fast as normal.
- A Potato Mine takes 3 patches to arm itself, but will be eaten by zombies if not armed. It recharges in 30 seconds (6 patches).
- The Wall-nut will stall zombies for 35 seconds (7 patches), and recharges in 25 seconds (5 patches).
- The Tall-nut will stall zombies for 70 seconds (14 patches), and recharges in 25 seconds (5 patches).
- It takes a Chomper 40 seconds (8 patches) to digest a zombie, during which time it is vulnerable to attacks.
- It takes a Grave buster 5 seconds (1 patch) to clear a grave, and it recharges in 7.5 seconds (1.5 patch).
- It takes a Squash 30 seconds (6 patches) to recharge.
- It takes a Tangle kelp 30 seconds (6 patches) to recharge.
- It takes a Jalapeno 50 seconds (10 patches) to recharge.
The Kernel-pult randomly fires either kernels, which take out a normal zombie in 5 patches (12 for coneheads), or butter, which will immobilize the zombie and takes out a normal zombie in 3 hits (7 hits for a conehead).
The Sunflower and Sun-shroom produce their first sun in 7 seconds (1.5 patch), but then take 20 seconds (4 patches) for every next sun. Recharging takes 25 seconds (5 patches).
Plant strategies
The game has a very nifty Suburban Almanac, which can be found in the main menu, that shows you a description of all the plants you have unlocked. In this section, I will give some additional hints on how to maximize the use of some of the plants.
- Chompers devour a zombie in one bite, but then take a long time to digest them. This makes them less effective in levels with many zombies. An effective way to work with them still, is to plant two chompers behind eachother, so when the first one is still digesting, the second one can eat the next zombie. You can also plant a wall-nut or tall-nut in front of them, who can protect the chomper for nearly the entire time it's digesting.
- Puff-shrooms are only used at night (waking them up with a coffee bean costs 75 sun, you can get better for that money), but they are free! It takes them 1.5 patch (7.5 seconds) to recharge. Their range is 3 patches, which is just enough to kill a single zombie before it starts chomping its head off. Be carefull not to place them closer to a zombie if you can help it.
- Fume-shrooms, another nocturnal plant, are your best attack against those Screen Door zombies. Luckily they have an added advantage of hurting multiple zombies at the same time. The Gloom-shroom you can put on top of it, limits its forward attack to 2 patches, but offer an extra 2 patch range to all other sides as well. However, planting them on the outside of the lawn, is quite a waste of money.
- Grave buster is a bigger help then you would firstly expect. During the final wave, most zombies come from the graves, yet if you clear the graves with this fearsome looking plant, the final waves will actually be a piece of cake. Take your time clearing the graves, you have the entire level to do so, so just send them out when you have suns left to spare.
- Hypno-shrooms take over a zombie when eaten and have them turn around and fight the other zombies, so naturally they are best used on the bigger zombies, like Football zombies.
- Scaredy-shroom is a cheap plant which works well in the back of your defensive lines, but cower and hide as soon as a zombie comes within 1 patch of them, leaving them wide open to a chomp-fest.
- Doom-shrooms are like the attomic bombs of the plant world. When they explode, they take out every zombie on 3 patches in each direction; a 25-patch area. They do leave a crater that can not be used for planting anymore though, but in time the patch will heal.
- Squashes are a good final defense, for whatever you really don't want to lose. They stomp every zombie on their patch, and the first patch to their left and their right.
- Threepeaters can be quite usefull in protecting a big area, and also do a little more damage with each single pea. Since they cover three lanes at ones, it'd be a waste to plant them on the sides.
- Spikeweed may not seem very useful on it's own, but in combination with other spikeweed, or other plants, it will get the zombie down eventually. One walk across a spikeweed takes about half of a normal zombie's health.
- Torchwood doubles the strength of any pea shooten through it. They also drive away fog in 3 patches in every direction.
- Sea-shrooms are the aquatic equivalent of the puff-shroom.
- Planterns light up an area covered in fog. As long as they are not eaten by zombies, they will clear 3 lanes of fog.
- Split peas are especially effective when dealing with Digging zombies, who try to attack from behind.
- Pumpkins are placed over other plants, and offer them an extra layer of protection against zombie gnawing.
- Kernel-pults can be either very effective, or very useless, because of their random attacks. If you're in bad luck and they only shoot kernels, you won't live very long. They work best in combination with another pult, that backs them up when they're shooting the weak ammo.
- Garlic can be extremely usefull, essentially completely protecting parts of the level. If you put one on the first, third and fifth lane, you basically have only got 2 lanes left to protect. You can put them next to eachother, but as the zombies change lanes, they also go forward half a patch, so they will eventually get through.
- Marigolds give you coins throughout the entire level, but certainly in the harder levels, are not really worth the risk of planting them instead of an attack plant.
- Cattails are planted on lily pads, but can attack any lane, giving them a very wide range of attack. They also take down Balloon zombies.
- Cobcannons are the most expensive plants available, but have a huge impact of 3 patches in each direction from the point of impact. Plant two kernel-pults behind eachother to be able to plant one of these big guys. Be careful for the time they take recharging between shots though: a hefty 25 seconds (5 patches).
- Imitator makes it possible to fill 2 slots with the same plant, meaning you won't have to wait as long for some plants to recharge.
The game has a very nifty Suburban Almanac, which can be found in the main menu, that shows you a description of all the zombies you have encountered. In this section, I will give some additional hints on how to best take on some of those thougher zombies.
- Pole Vaulting zombie jumps over the first plant he encounters, so if you encounter him in a level, make sure you have a back-up.
- Buckethead zombies are tough critters, that take a lot of damage before going back to being undead; up to 5 times as much. Consider a squash or other one-hit wonders if you don't have the artillery to bring them down. A magnet-shroom will make your life with these zombies much easier though.
- Screen Door zombies are very though with their screen door shield, but if you use a magnet-shroom to take the door, or a fume-shroom to shoot through the door, they will be down soon enough. It is adviced to plant a fume-shroom as soon as you see these guys enter the screen though.
- Football zombies are though like the buckethead zombies, but are also fast! Same strategy applies, but you'll have to act faster.
- Dancing zombie is a nightmare, not just because he fails to see how his carreer is over, being dead and all. As soon as you see him, kill him with anything immediate, like a squash or cherry bomb, before he summons a bunch of Backup Dancers.
- Snorkel zombies swim underwater, but will have to come up to get past a barrier like a lily pad. Unless you have a tangle kelp to take these zombies out, their consuming your plants is your chance to take them down.
- Zomboni is a zombie on a zamboni, and very though because of that. Even worse, he crushes your plants and leaves a trail of ice behind him, which opens the way to the Zombie Bob Sled Team and the Zombie Yeti. Take him out as fast as possible, with a Jalapeno or Squash. A Jalapeno will also melt the ice trail he left.
- Dolphin Rider zombies are your worst nightmare in the pool, as they are very fast and jump over your first plant. A trick to still catch him in your plant's line of fire, is to plant a lily pad at the beginning of the pool, so he jumps over the lily pad and is then slow as a normal zombie.
- Jack-in-the-box zombies are fast, but other then that, pose no big threat.
- Balloon zombies think they're smart by floating over your attack plants, but are easily taken down by a cactus or a blover.
- Digger zombies are tricky zombies that dig through your garden, come out at the other end and eat their ways through your plants from the back. Use split-peas to have a guard against them, or a magnet-shroom to stop them in their underground tracks.
- Pogo zombies jump over nearly every plant you put in front of him, but is stopped short by a magnet-shroom.
- Bungee zombies are death from above. Just before they drop down, you will see a bulls-eye appear on the ground, and before you know it, they've come and gone with one of your plants. The umbrella leaf is your only defense against them, though you could catch them with a Jalapeno, but in general, it's best to just take your loss.
- Gargantuar is, well, gargantuan, and so is his toughness. The chances of killing him with normal attacks are so slim, you're best of with a squash, cherry bomb or jalapeno. Preferably before he throws his Imp friend behind your lines.
- Dr. Zomboss is the big boss of all the zombies, and appears only in the last level. It's a long fight, and he will annoy with his random throwing of vans, and deployment of bungee zombies, but he also has his weaknesses that can give you the edge.
- When he puts his head down, is when your pult-plants can attack him. Use an Ice-shroom to freeze him, and give your plants longer to attack. You can freeze him again when he comes down for a second time, after defreezing.
- Before going back up, he will shoot a big ball of fire, or a big ice ball from his mouth. You can break these balls by using either a Ice-shroom (on the fire ball), or a Jalapeno (on the ice ball).
After beating level 5-4, you will unlock the Zen Garden. Besides being Zen, and making you happy (you don't have to be a hippy to be made happy be flowers), tending to the flowers in the garden will also earn you money. While the initial price of $3.000 per flower that Crazy Dave charges might seem steep, you will earn it back by the coins they give you over time, and when fully grown, you can sell them back for $3.000. You will know a plant is fully grown when there are sparkles surrounding it.
Besides buying Marigolds at Crazy Dave, you will also randomly receive plants for your Zen Garden while playing the game, but after having beaten adventure mode at least once. These plants are usually worth quite a bit more.
In time, you will also receive mushrooms and aquatic plants for your Zen Garden. You will need to buy their own environments to be able to grow them. Use the gardening glove to move them.
Lastly, you can buy the Tree of Wisdom environment, where you will find a sprout of the Tree of Wisdom. The more you feed him, the more tips and tricks he will give you. However, you can also simply check the end of this walkthrough.
Mini-games
ZomBotany – the tables are turned, as the zombies' heads will now be peashooters, and shoot back! Even if you've never used wall-nuts or tall-nuts before, you might want to give them a try now.
Wall-nut bowling – roll wall-nuts from behind the line to take out the zombies. The key here is to make combo's, whether it is by rolling an explosive wall-nut in the middle of three groups, taking out one group on each line, or by bouncing them off zombies.
Slot-machine – very random, and thus possibly very dangerous. Set up a lawn defense with whatever the slot machine offers you.
It's raining seeds – like the slot machine, a pretty random game where you need to put up a lawn defense with whatever comes raining down. It's on the fog-level though, so be extra careful, and be prepaired for anything.
Seeing stars – while defending your lawn, place star fruits on the marked places. I found the best way, next to planting lots of sunflowers, is to start with a star fruit in the middle, and placing a tall-nut in the space behind one of the directions you shoot in. That way, you still them right where you can reach them. Also take some cherry bombs if they're getting too close. Expand your star fruit collection from the middle.
Zombiquarium – feed the snorkeling zombies in the aquarium to get more suns, which you can use to get new zombies. Eventually you will want to collect a 1.000 suns to finish the level. Don't feed the zombies too fast, or it will just be a brain (and 5 suns) wasted, but when they turn green, watch out as they're about to, ehm... undie. How many zombies you take total depends on your patience, and skills to keep clicking.
Beghouled Twist – a twist of Bejeweled Twist, your goal is to twist the plants to make 75 match 3's, while defending your yard. A good twist will earn you sons, which you can use to upgrade your plants.
Big Trouble Little Zombies – another mini-game where you are randomly given plants, now via a conveyor belt. The zombies are little, but still cause big trouble. You will only receive peashooters, cherry bombs, lily pads and wall-nuts. Try and get a peashooter on every row as soon as possible, and use cherry bombs to take out zombies in groups.
Portal Combat – it seems to start out easy, with both zombies and your bullets going through a portal one way, and out the twin portal. The tricky thing is that the protals will change positions, so setting up a strategy is difficult. Try and put a repeater with a torchwood on the first 2 places of each lane, since those are least likely to be portaled.
Column Like You See 'Em – in this level, you will be on top of the roof, and every item you place from the conveyor belt is placed in all pots on the row you select. The best strategie is to have a tall-nut in the very front, with magnet-shrooms just behind that, and pults at the very back. Remember that peashooters can't shoot over the bending of the roof. When your tall-nuts are defeated, use a jalapeno and hope for another line of nuts.
Bobsled Bonanza – in Bobsled Bonanza, you will only face Zomboni's and Bob Sled Team Zombies, so your choice of plants should be peashooters (single and repeaters) combined with the torchwoods, jalapeno's to melt the ice, and then spikeweed to pop Zomboni's tires. The imitator is very usefull for using extra sunflowers or jalapeno's.
Zombie Nimble Zombie Quick – it is very easy to get confused on this level, where all the zombies go twice as fast. Don't worry though, since so are your plants. And since there are mostly weak zombies, it all comes down to fast decission making.
Whack a Zombie – wack-a-mole with zombies, only now they're moving towards the house! Make good use of the extra items you have, and train your fast reflexes.
The Last Stand – you start with $5.000 and need to set up your plants to survive 5 rounds of zombies, with $250 to refill between rounds.
Below you find my winning strategy (encircled in red are added or updated items):
Starting set-up for the first flag
Set-up for the second flag
Set-up for the third flag
For the fourth and the fifth flag, I simply repaired my army of plants.
ZoBotany 2 – a harder version of ZomBotany
Walnut Bowling 2 – a harder version of Walnut Bowling
Pogo Party – a combination of squash, pults and magnet-shrooms are your best friends on this pogo party.
Dr. Zomboss' Revenge – as the title implies, you fight against Dr. Zomboss again, but this time, he'll be even harder. Good luck!
Puzzles – Vasebreaker
The vasebreaker puzzles will have you break a lawn full of vases, randomly containing either plants or zombies. Since it is quite random what comes out, and the plants disappear if you don't plant them fast enough, it's hard to really set up a good strategy. There are some things that are helpful to keep in mind:
- Start with the lines on the right, and work your way left.
- If you see the plants currently in your line are strong enough to take care of the zombies there, don't waste any plants on that line anymore.
- Always use a squash against buckethead zombies.
- Keep at least two squashes to take down gargantuar, which is the only way to take him down.
Puzzles – I, Zombie
- In the I, Zombie-puzzles, you will be playing the part of the zombies, and gnaw your way through the defensive plant lines. Since the puzzles are randomly generate, here are some tips per puzzle:
- I, Zombie - first collect the row with most sunflowers, then use the normal zombies to get rid of the sqaushes and use the buckethead zombies and football zombies to withstand the attacks from the plants.
- I, Zombie Too - nothing special here, rely on your screen door zombies and buckethead zombies.
- Can You Dig It? - first send in a buckethead zombie to gather sunflowers, and then attack the plants from behind with the Digger zombie. Be especially careful to attack the lines with torchwoods from behind, or you'll be burned.
- Totally nuts - don't waste your time trying to gnaw through the wall-nut but simply use ladder zombies to climb over them. Their ladders will stay, so you can send in any other zombies behind them.
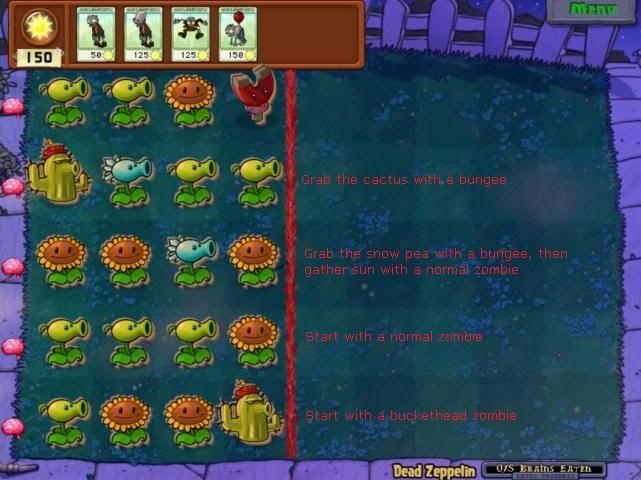
- Dead Zeppelin - balloon zombies are really useful in this level. Use normal and buckethead zombies to gather as much sun as possible, take out the cactus plants with a bungee, and send in the aerial troops. See the image below for an example strategy.
- Me Smash! - use pole-vaulting zombies to jump over the garlics and the torchwoods, and work their way through the sunflowers. Should a pole-vaulting zombie die after killing all the peashooters on that line, you can just send in a normal zombie to eat the torchwood. Use guargantuars to clear the lines with the squashes.
- ZomBoogie - send in the normal zombies first to gather the first sunflowers, untill they are eaten or blown up. If after this, there is another sunflower open (with a mine behind it, not a chomper), get that one as well. In case you have the situation where there is just a mine/chomper left in a row, use a pole-vault zombie. Send a dancing zombie into the row you have emptied out most, and see how far it gets, before finishing the job with the other zombies again. Remember that chompers can't are vulnerable when they already have a zombie in their mouth.
- Three Hit Wonder - first use a cheap zombie to get some sun, then use a bungee zombie to remove the magnet-shroom. If there's a squash behind it, use an imp to take care of the squash. If there is just one plant in the magnet-row, you could also just use a conehead zombie. Mines in the middle of a row are best removed by a bungee zombie, and then send in a digger zombie to clear the row from behind. If you're impatient, you can also use multiple bungee zombies and ladder zombies to quickly go through a row with multiple wall-nuts.
- All your brainz r belong to us - this is a tricky one, where the main point is to stay away from the threepeaters in the beginning. Use imps or a digger zombie to get to a sunflower, but with the digger, be aware that he's a little dizzy at first when coming out of the ground, thus being vulnerable to a split pea's attack.
- I, Zombie endless - is, just like facebreaker endless, an endless mode of I, Zombie, where the goal is to finish as many streaks as possible, Apply all your earlier tactics to tackle any situation.
Survival
In survival mode, your goal is to survive 5 flags of attacks, in several locations. After each flag, your garden and sunscore is kept, but you will be allowed to fill your slots again, possibly with new plants. Use this to your advantage, by building basics of your set-up in the earlier and easier attacks, to be able to go all-out in the last stand.
Tree of Wisdom's Tips and Tricks
- Chompers and Wall-nuts work exceedingly well together.
- You want two columns of sunflowers.
- Snorkel Zombies... are best dealt with, with Wall-nuts on Lilypads.
- Have you heard of the elusive Yeti Zombie? Some say he likes hiding where it's pitch black.
- How many cherry bombs does it take to take down a Gargantuar? Here's a hint: more than one, fewer than three. Here's a more explicit hint: Two.
- If you're looking for mushroom plants for your Zen Garden, you'll have better luck playing on levels where it's night time.
- I wouldn't worry about permanently damaging your lawn with Doom-shrooms. In time the earth heals itself.
- Have you tried clicking on the flowers on the main menu? Give it a shot! I'll wait here.
- Legend has it that frozen zombies eat slower. I'm here to tell that legend has its facts straight.
- Pssst! Try typing 'future' while playing to experiences zombies... from the FUTURE!.
- What's cheaper than free? Nothing! That's why Puff-shrooms are essential on all night levels!
- Are you hoping to find water plants for your Zen Garden? I bet my phloem you'll have the most luck searching in pool levels.
- Have you noticed that Gargantuars sometimes use OTHER ZOMBIES to bash your plants? Whatever works, I guess.
- Stinky the Snail sure loves his chocolate. Maybe loves it a little too much, you know? He won't sit still for an hour after he's had some.
- If you think playing survival 'endless' mode only drops pool-style plants for your Zen Garden, think again! It drops everything-style.
- Often the question is asked: where do you find chocolate? A better question would be: where DON'T you find chocolate? It drops in every game mode.
- Grave busters, eh? Pick 'em only when you can see graves on the right side of the screen along with the zombies. That's what I do.
- I've heard that Buckethead zombies take five times as many hits as regular ones.
- The number of coins you receive in Wall-nut bowling is proportional to how cool you are as measure by how many ricochets per nut you can pull off.
- Do multiple Snow-peas in a row slow zombies down more than just one? The sad but truthful answer is 'Nay.'
- You know that zombies emerge from gravestones, right? So what's stopping you from using gravebusters to get rid of them in Survival night? Is it pride?
- If you're looking for the inside info on how long a level's going to be, count the flags on the level meter. That'll set you up real nice.
- Roof cleaners. Classic items. Can't recomment them highly enough. Best thing about them? They give you a shot at beating Pogo Party.
- If you're wondering if feeding a Hypno-shroom to a dancer zombie compels him to summon backup dancers for you, bet it all on 'Yes.'
- Make Money Fast! By Playing Survival Endless! Then E-mail Me Your Bank Account Number!
- You'd think Torchwoods would douse snow peas. And you'd be correct, because you, my friend, are one smart cookie.
- Those hateful Zombotany zombies! Who do they think they are, shooting at your plants? It's a good thing Wall-nuts stop 'em cold.
- The Pogo Party and Bobsled Bonanza mini-games are really, really, really difficult. Wanna drop one of those 'reallys' off that description? Use the Squash.
- Just when you thought jalapenos couldn't be any more useful, a Tree of Widowm lets you know that they also destroy the Zomboni's ice trails! Bam!
- Once you buy the Imitater, try clicking the little drawing in the upper left corner of your Almanac to access the entry on that sucker.
- I hear that typing 'mustache' brings about a terrifying transformation in the undead!
- Please do not tap on the glass! Or actually, go ahead, right-click on your Aquarium Garden or during Zombiquarium to deafen your underwater creatures.
- When I was just an acorn my grampa told me, 'Son, Vasebreaker puzzles are much easier if you break the vases on the right side first.'
- Dancers in I, Zombie may seem expensive, but in the right situation they're worth every penny.
- I had a dream. In it, cattail spikes popped balloons and dropped zombies to the ground. I don't know what it means.
- Growing aquatic plants in your zen garden is pretty much impossible without the zen aquarium. Just saying.
- Digger zombies violate the natural order with their subterranean ways. It's only fair to use Magnet-shrooms to steal their mining picks.
- Every day brings new challenges and opportunities. Oh, and new Marigolds in Crazy Dave's Shop.
- Mushroom Garden! Huh! What is it good for? Absolutely nothing'! Except growing mushrooms, that is.
- Tired? Depressed? Ladders on Tall-nuts getting you down? A quick Magnet-shroom will whisk your cares away!
- The tallness of Tall-nuts earns widespread acclaim due to their effectiveness vs. Dolphin Riders and Pogo Zombies.
- The explosive force of a Cherry Bomb is more than capable of disloging a ladder from a wall-nut.
- It's tempting to feed all your chocolate to Stinky the Snail. He's such a chocolate hog. But remember: zen garden plants like chocolate too!
- Torchwood fire is hotter than rage, but Zombonis, screen doors, ladders and catapults can take the heat.
- If you rely on upgrade plants in Survival endless, be acutely aware that they get more expensive the more you have on your lawn.
- The Imps in I, Zombie seem weak. But they're speedy and great for fetching that last brain when you've cleared the rest of the opposition.
- If you type 'tricked out,' don't be surprised if you see something wacky happen to your lawnmowers.


